树莓派基于YOLOV5的二维码检测与跟踪系统
版本信息
更新时间:2025.9.19
版本:V1.2
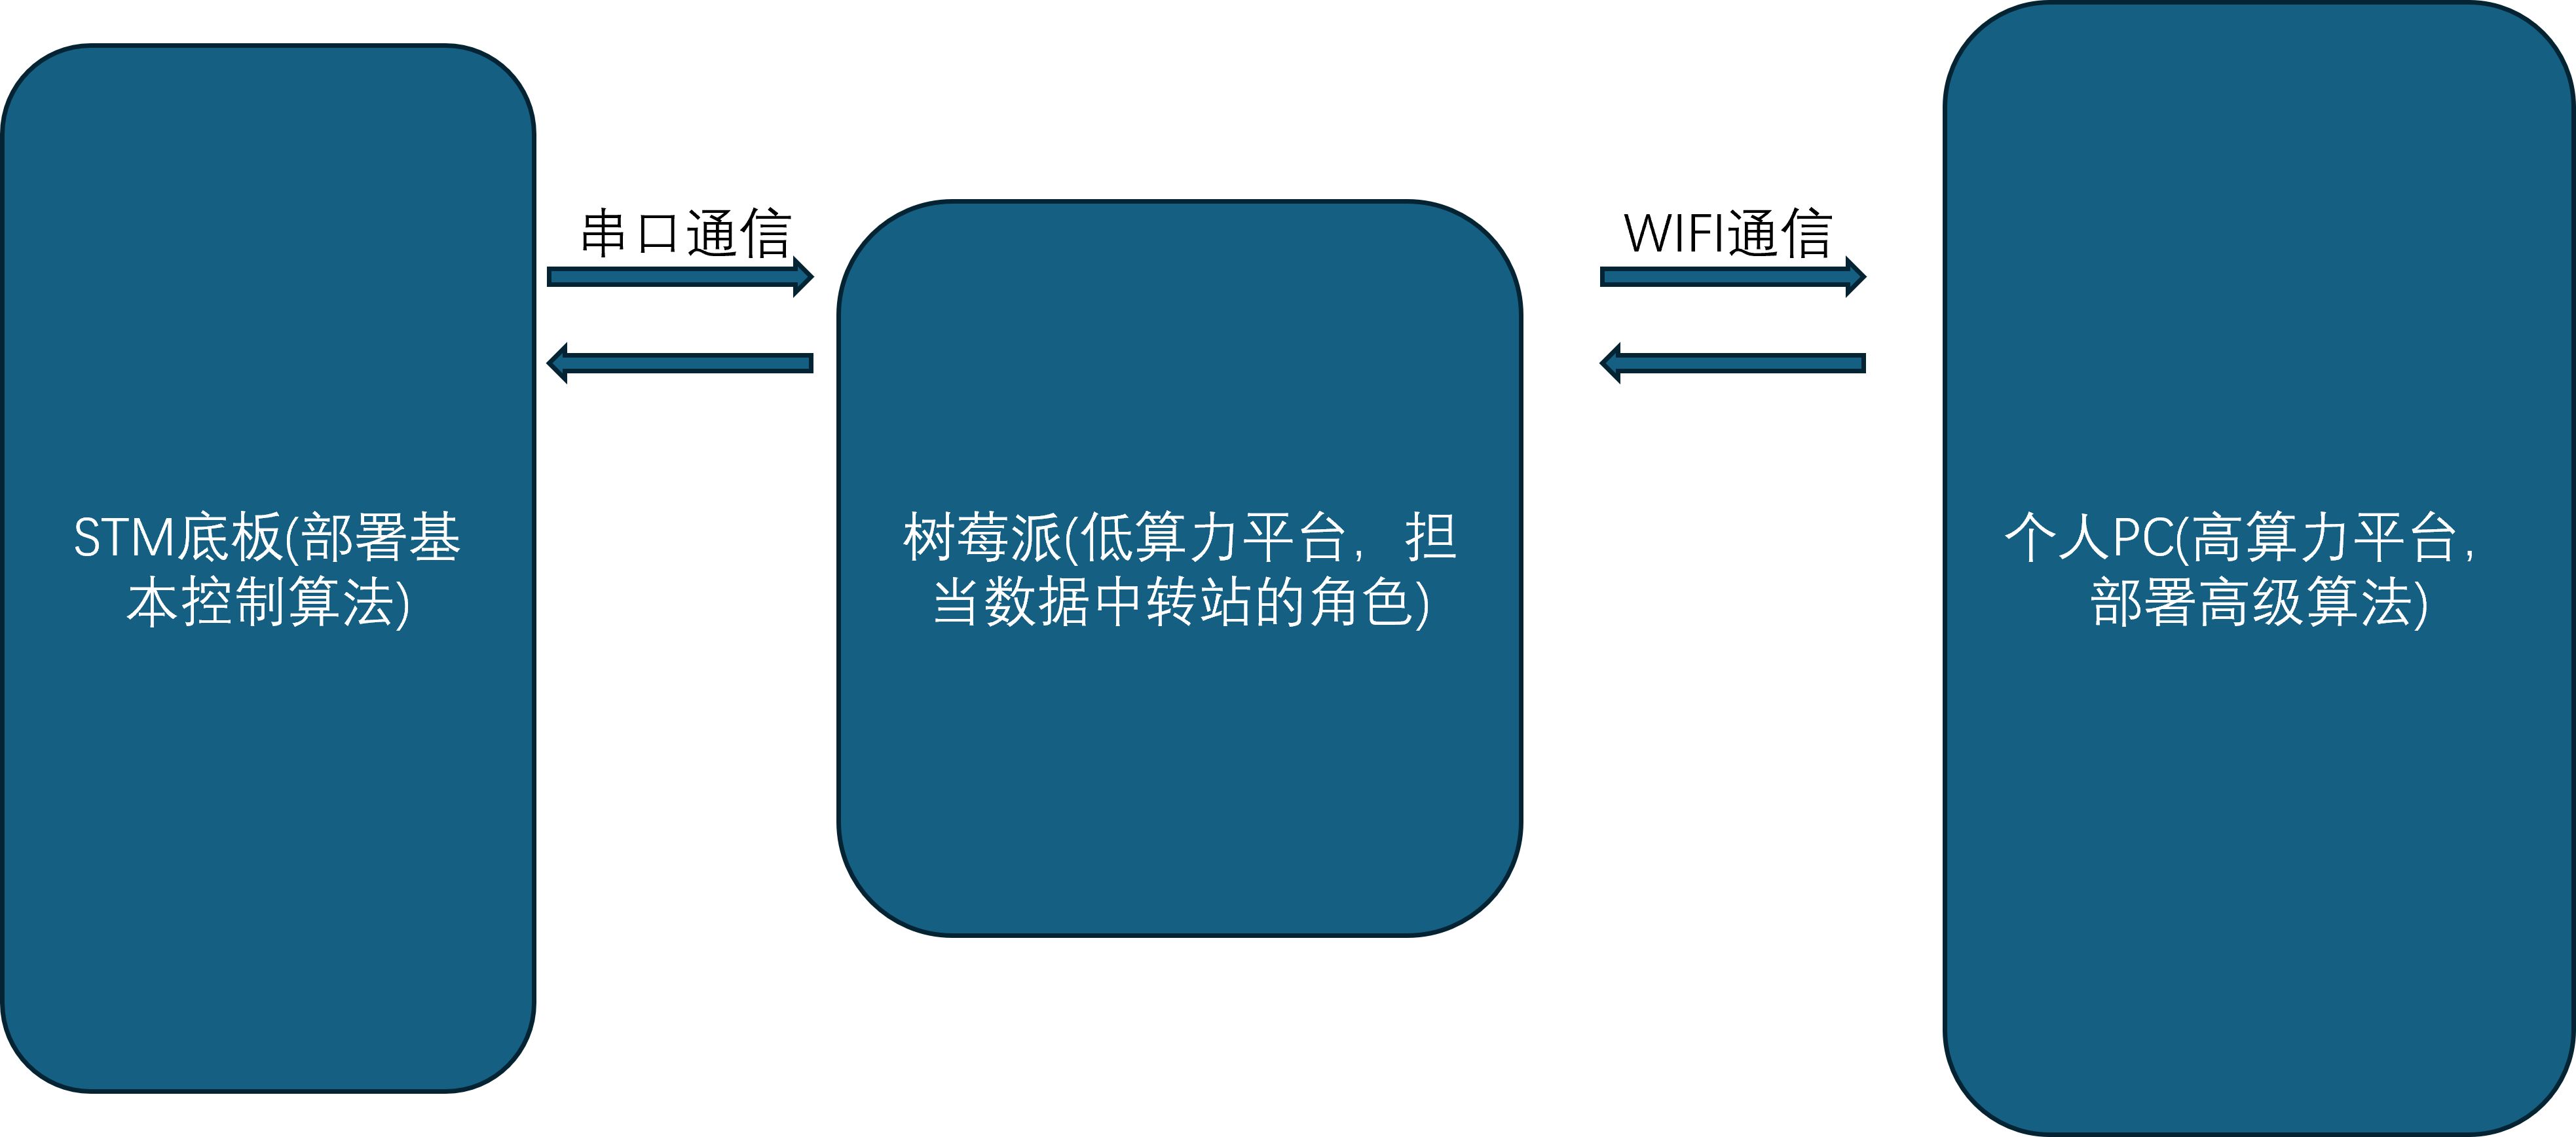
系统架构
项目文件总览
QRcode_detection
├─ datalink_serial.py
├─ mavcrc.py
├─ mavcrc.pyc
├─ mavlink.py
├─ mavlink.pyc
├─ track_lock.py
└─ __pycache__
   ├─ datalink_serial.cpython-38.pyc
   ├─ mavcrc.cpython-36.pyc
   ├─ mavcrc.cpython-38.pyc
   ├─ mavlink.cpython-36.pyc
   └─ mavlink.cpython-38.pyc
serial_wifi_demo
├─ auto_ap.sh
├─ datalink_serial_wifi.py
└─ README.md
best.pt
实验平台
本教程实验平台:幻思创新FanciSwarm® 树莓派Zero2W 无人机和个人PC的虚拟机Ubuntu20.04LTS环境,Ubuntu系统安装教程请点击查看。
无人机串口配置
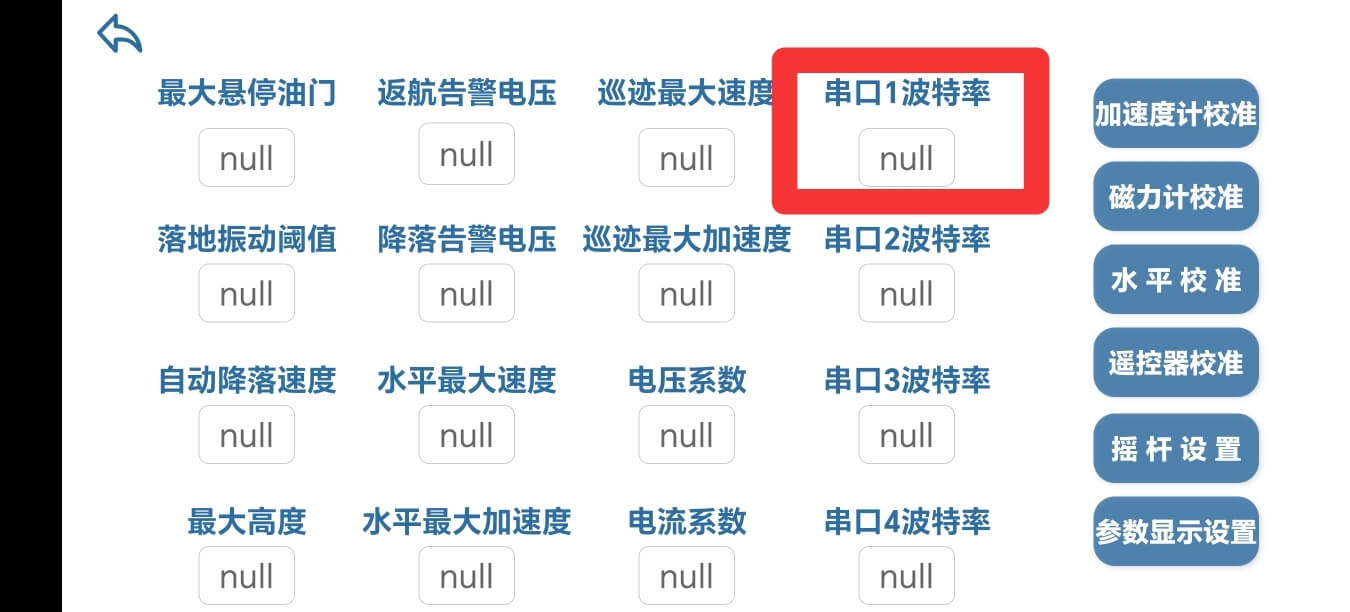
先按照官网教程学会连接无人机的手机APP
在APP中,把串口1波特率配置为460800
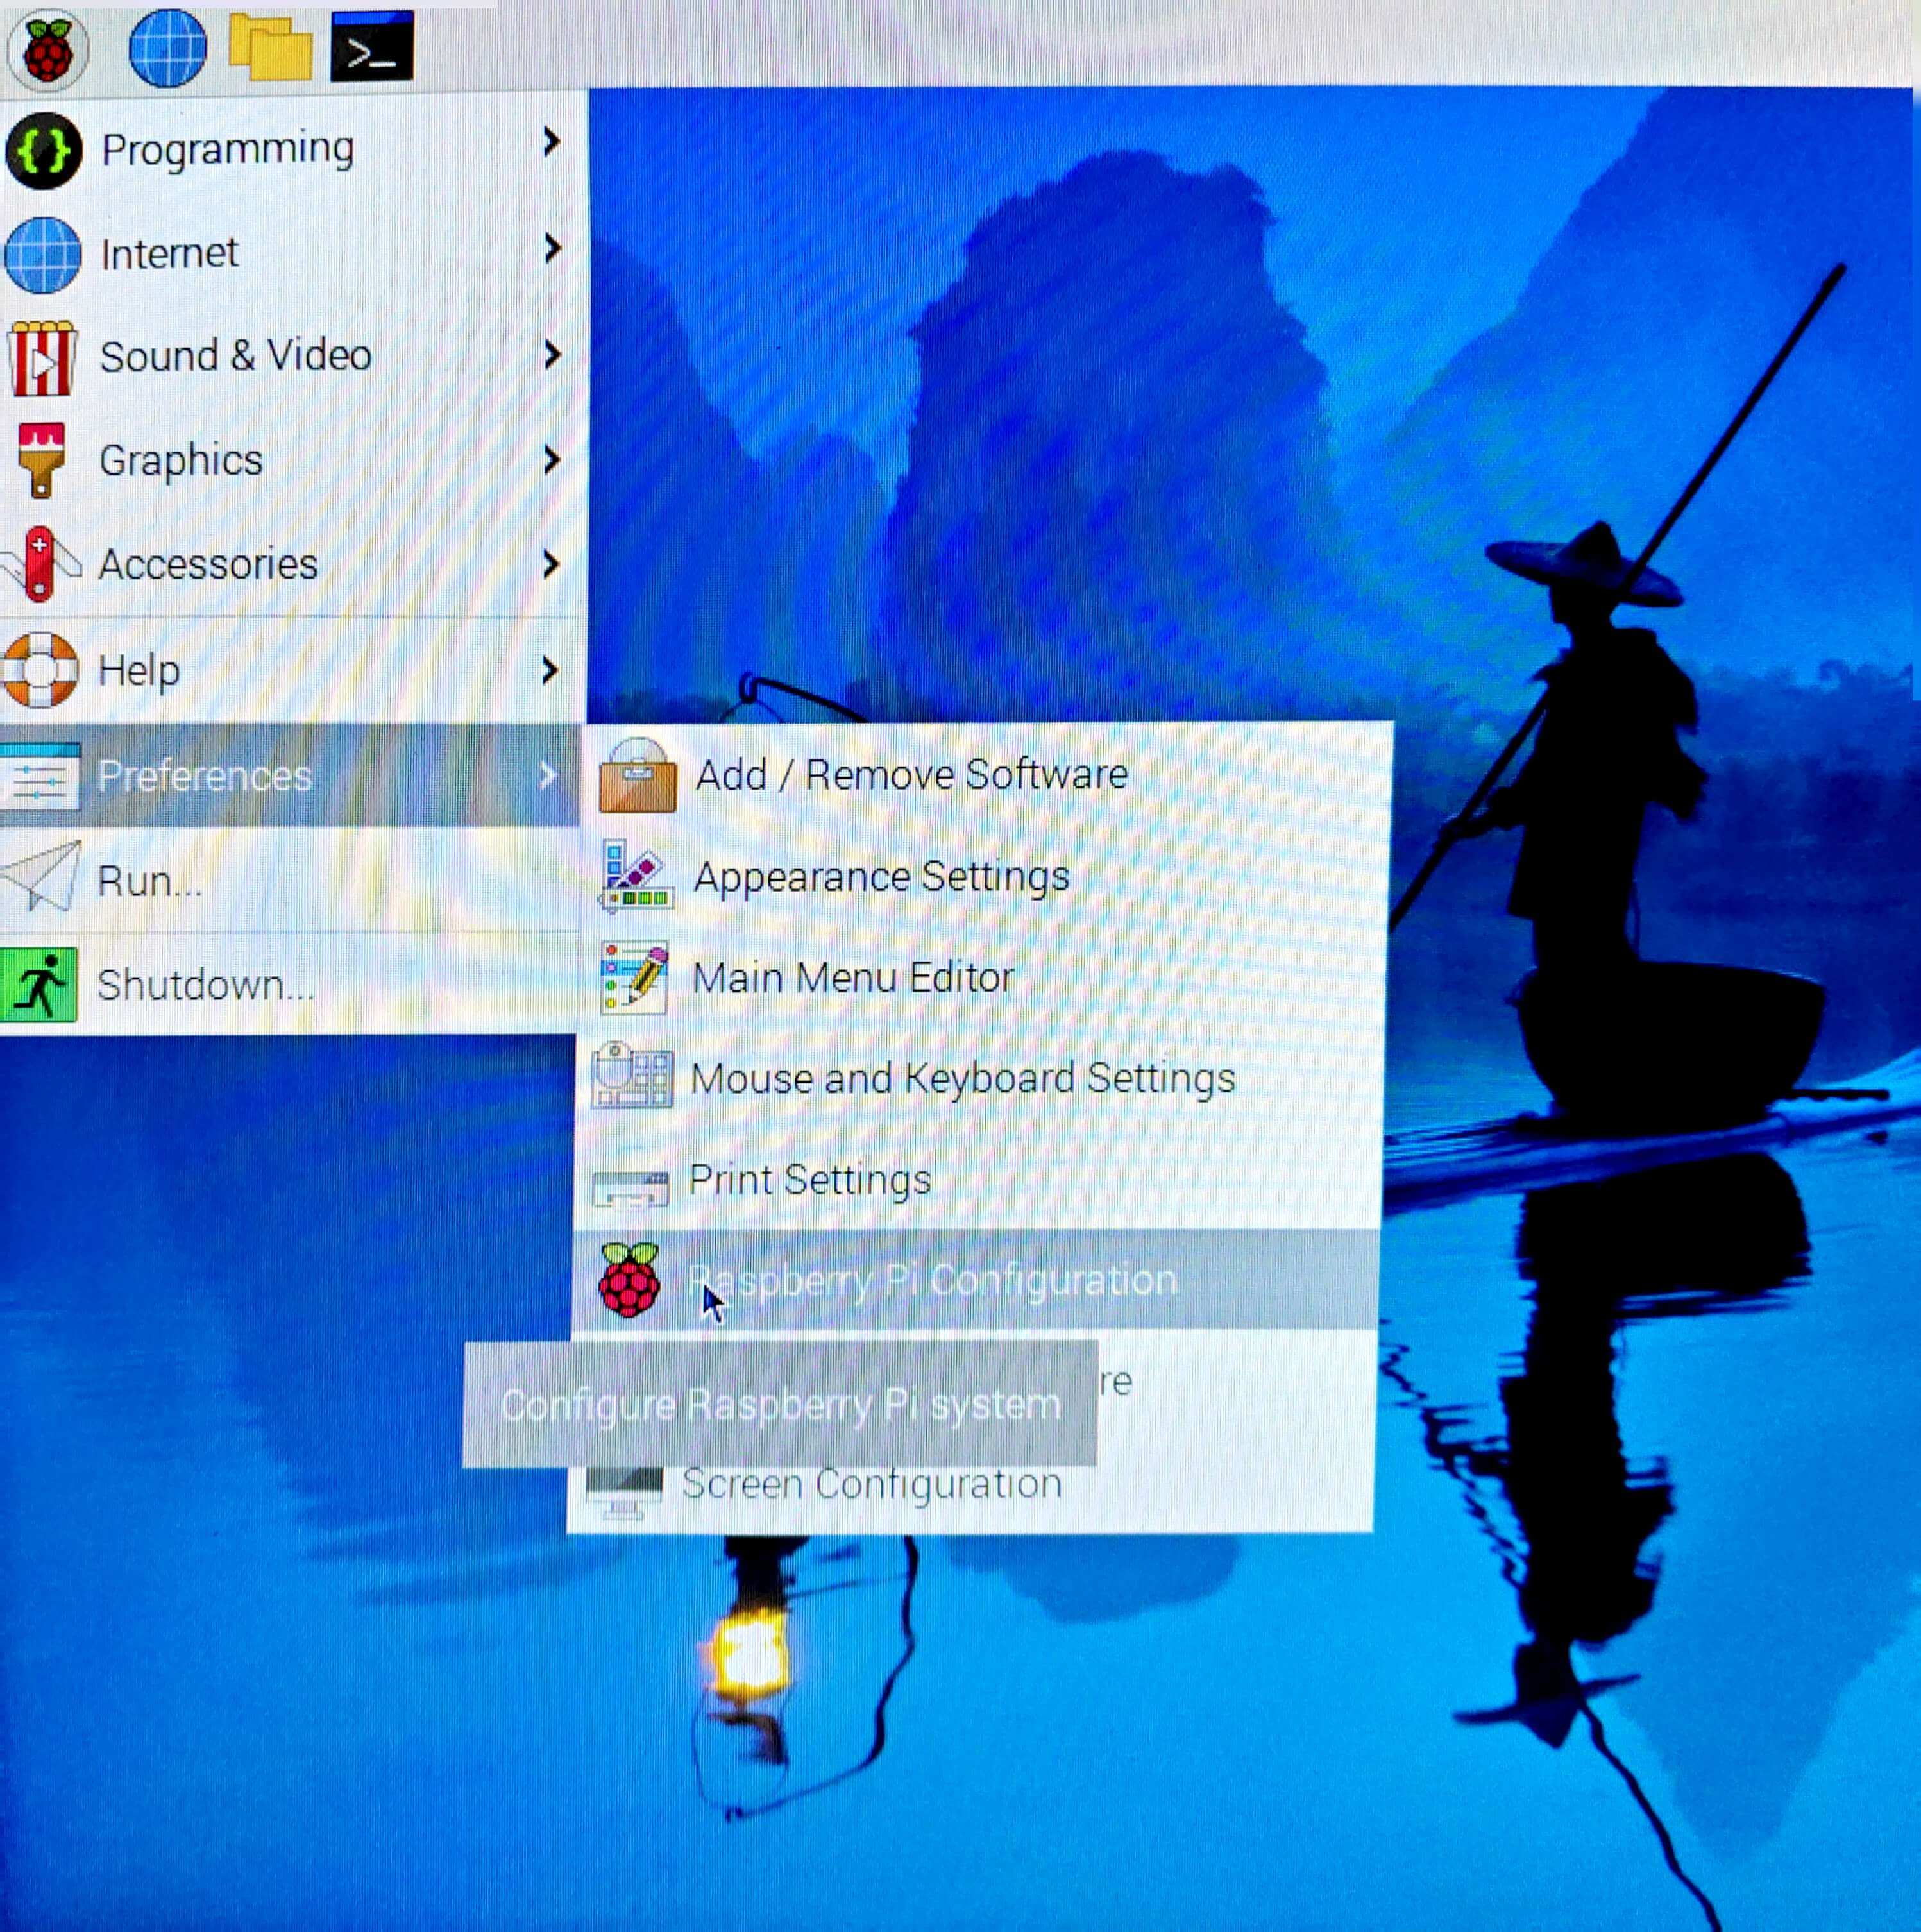
树莓派配置
树莓派端作为中转,主要有如下功能:
- 将摄像头获取到的视频流传给PC端,用于二维码的检测。
- 获取PC端处理后的二维码位置信息。
- 将位置信息传给飞控,用于无人机的姿态和位置控制。
基于以上功能,需要对树莓派端做如下配置:
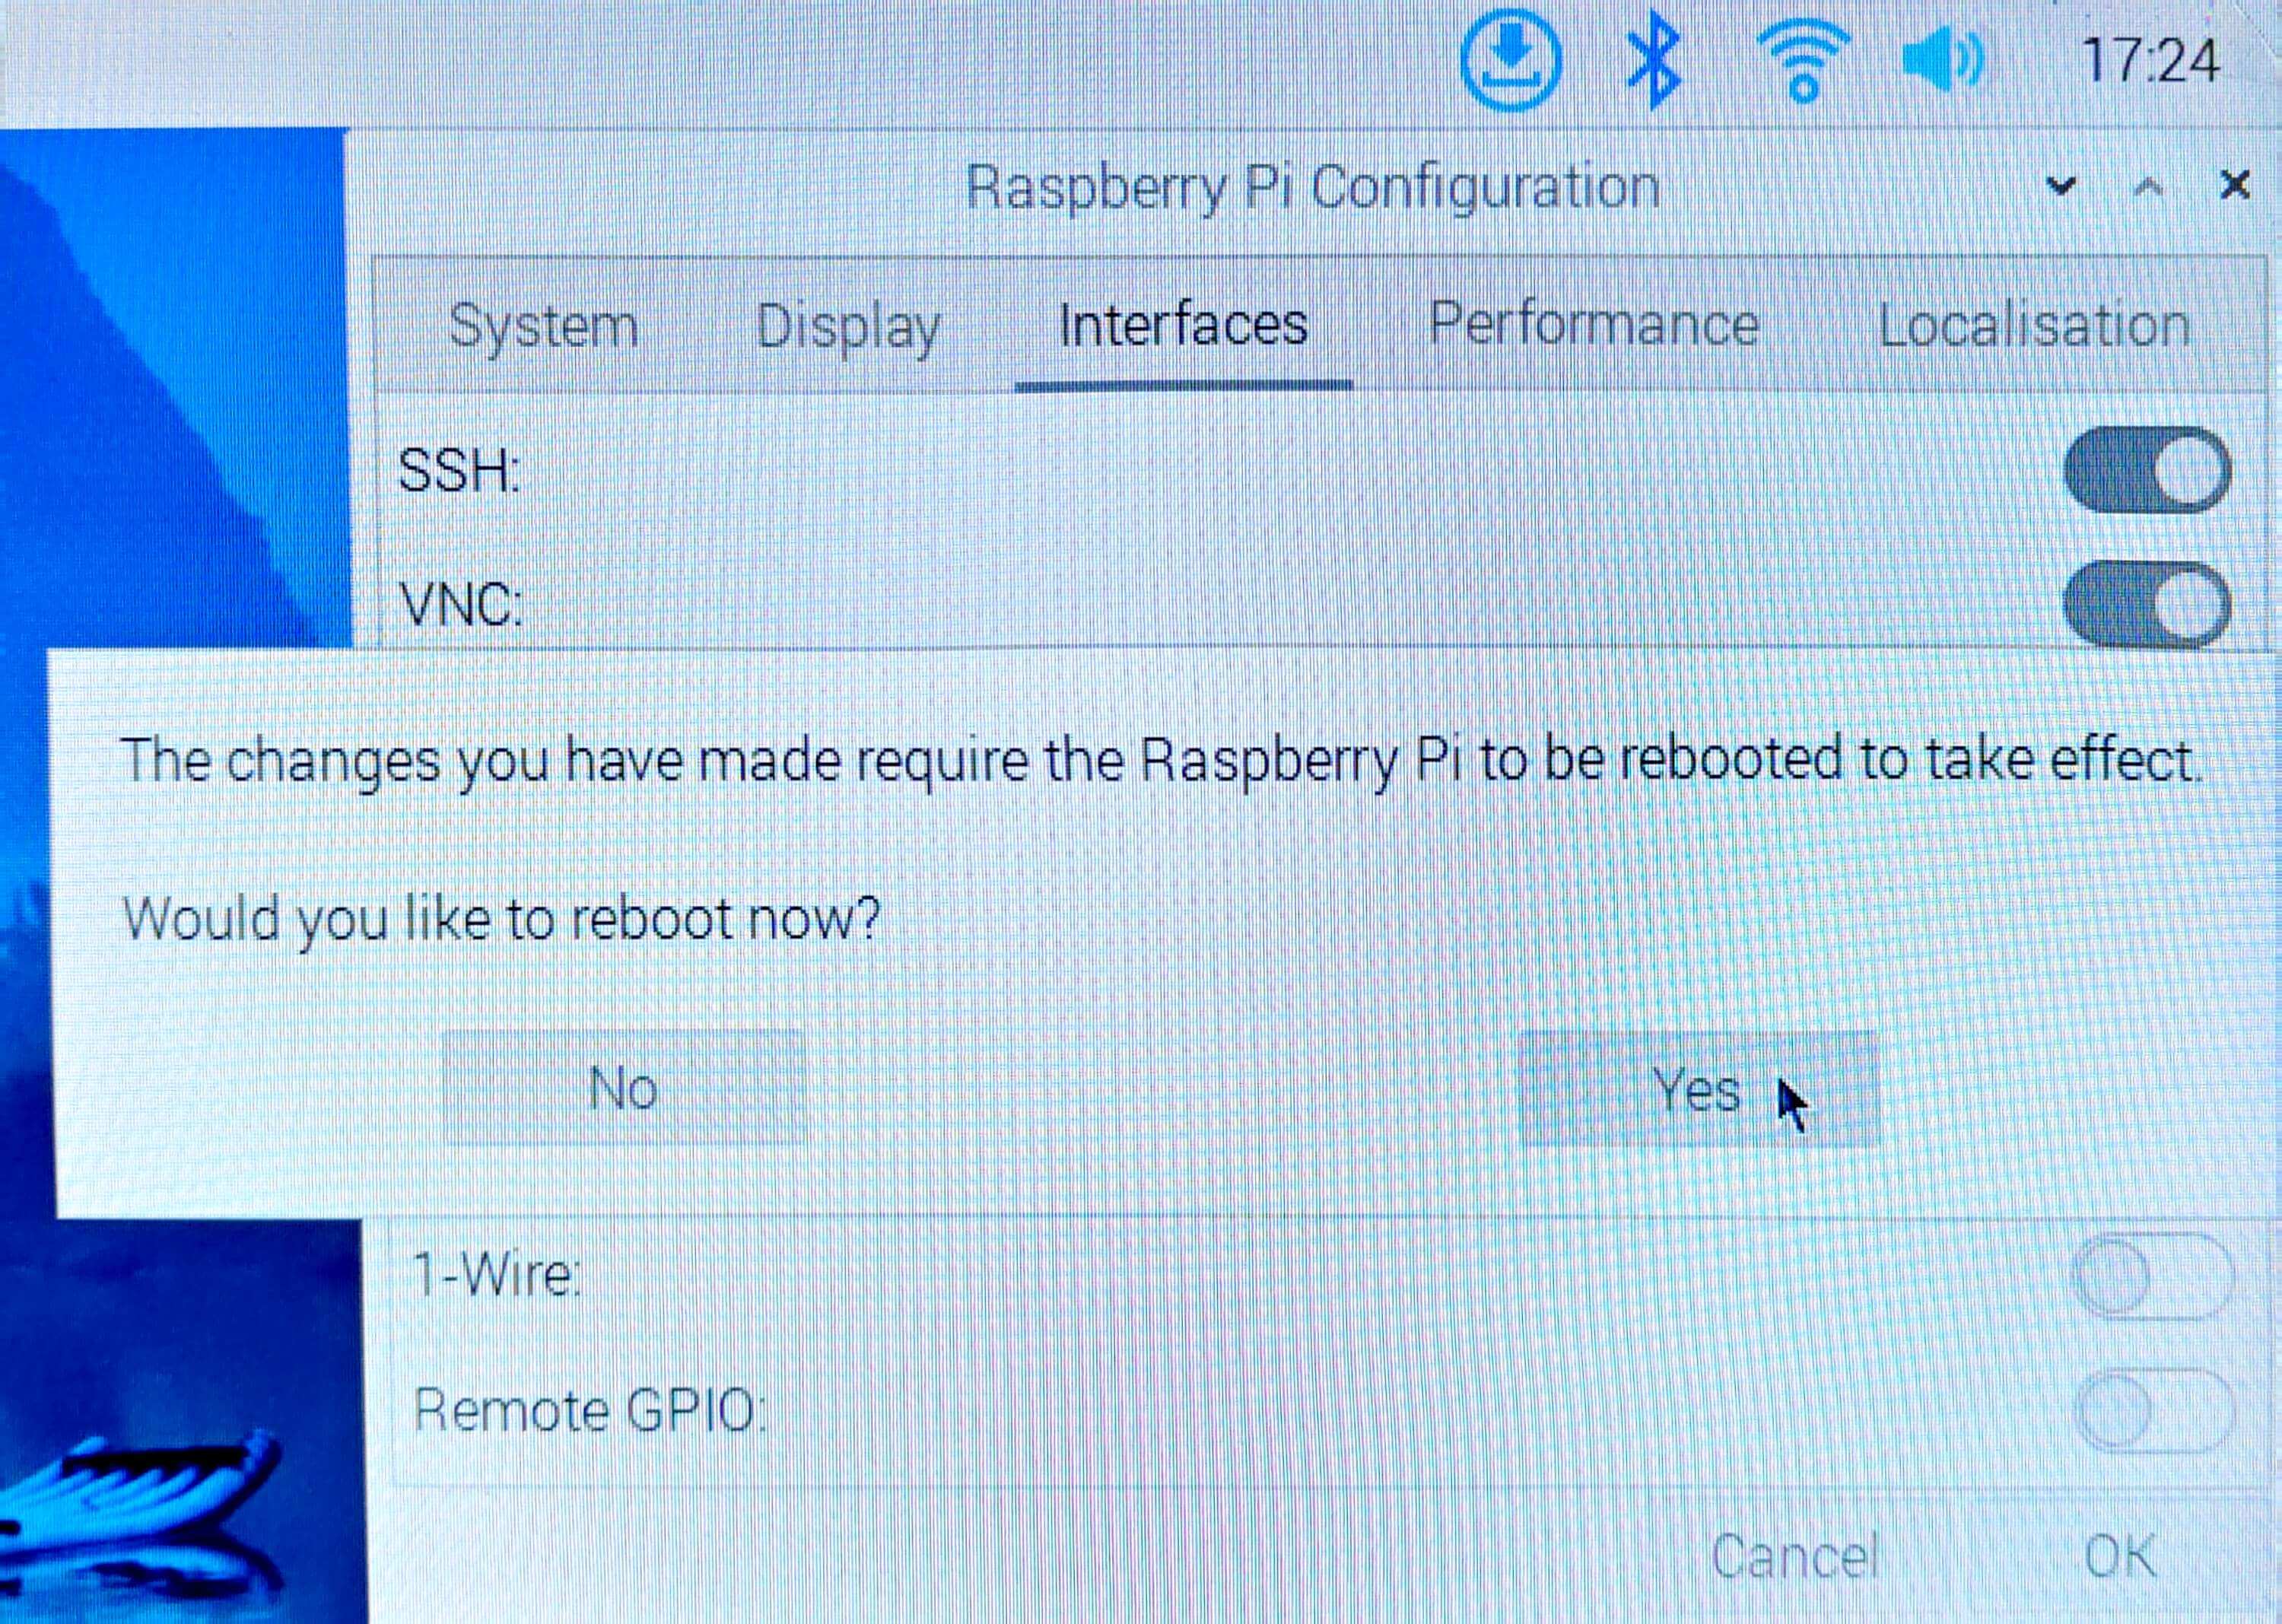
- 开机自启动
- 开机自启动配置
sudo gedit /etc/rc.local- 在“exit 0”上面加入
su pi -c "sh ~/auto_ap.sh"- 配置树莓派串口
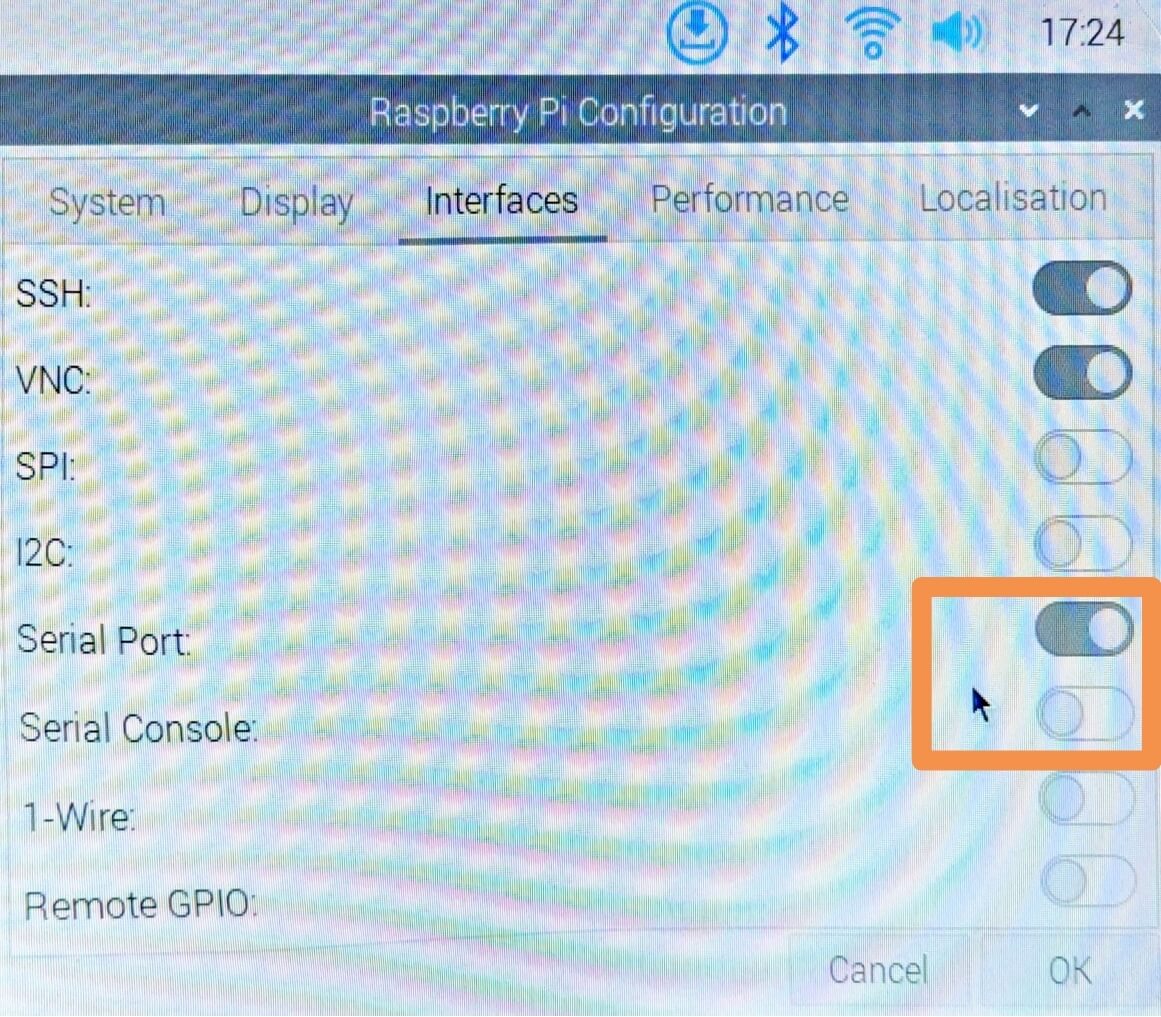
- 配置IP地址
- 在datalink_serial_wifi.py第12行中配置:
HOST_IP = "192.168.0.201" # IP地址不固定,要考虑路由器可用IP范围- 在auto_ap.sh(自启动脚本,脚本文件在serial_wifi_demo中):
更详细的树莓派配置说明在serial_wifi_demo的README文件中sudo ifconfig wlan0 192.168.0.201
PC端配置
PC端作为数据的处理中心,主要有如下功能:
- 接收树莓派图像数据,并将数据展示到屏幕上进行播放
- 加载检测模型,进行目标坐标点的绘制与展示。
- 将目标点数据返回给树莓派,从而控制飞机运动。
基于以上功能,需要对PC端做如下配置:
-
YOLO环境搭建
- 下载git,并clone官方项目地址:
sudo apt update && sudo apt install git #下载git git clone https://github.com/ultralytics/yolov5.git #克隆官方yolov5地址- 进入yolov5仓库,下载依赖(可以使用conda环境工具,更利于python环境管理),要注意下载的python包版本,不同版本的函数会有差别。
qrcode-detection v0.1.0 ├── opencv-python v4.12.0.88 ├── seaborn v0.13.2 ├── torch v2.7.1 └── ultralytics v8.3.169 cd ./yolov5 pip install -r requirements.txt # 安装工程依赖 pip install ultralytics pip install seaborn pip install pynput sudo apt install ffmpeg- 下载hubconf.py及其依赖,hubconf.py是 PyTorch Hub 项目中用于定义模型入口的一个 Python 脚本文件,便于我们在仓库外部指定模型入口。
wget https://raw.githubusercontent.com/ultralytics/yolov5/master/hubconf.py # 下载hubconf.py pip install ultralytics # 安装hubconf.py依赖- 下载yolov5文件包
- 更改源文件,将common.py中的2处(879行和906行,本教程使用最新版yolov5,其他yolov5版本可能会略有差异)
with amp.autocast(autocast): # 在新版本的pytorch中被弃用了更换为
with torch.amp.autocast(device_type='cuda', dtype=torch.float16): -
下载项目源码并运行源码
- 其中track_lock.py为主程序,data_link.py 中包含着自定义消息类,mavlink.py是第三方mavlink协议工具包。
- 在下载好项目源码之后,更改track_lock.py中第95行定义模型入口的函数参数。
model = torch.hub.load('本地yolov5的绝对路径', 'custom', path='.pt文件的绝对路径', source='local') #根据实际模型路径修改- 更改过源码之后就可以运行程序了
python3 track_lock.py启动后可以看见两个窗口,一个为实时显示,另一个为Aruco码检测窗口,出现Aruco码时候会检测并打印其位置信息。
- 我们还提供了键盘解锁,起飞,降落,上锁功能
特别注意!下面操作可能触发飞机自动起飞,请先确保飞机状态良好,在飞行场地安全条件下再进行操作。- 键盘按键"a" -- 解锁
- 键盘按键"d" -- 上锁
- 键盘按键"t" -- 起飞
- 键盘按键"l" -- 降落
程序说明文档
代码组成
代码主要部分
- 导入库
import torch # 导入 PyTorch 库,用于构建和训练深度学习模型
import cv2 # 导入 OpenCV 库(cv2),用于图像和视频处理,例如读取、显示、保存图像等
import numpy as np # 导入 NumPy 库,用于进行高效的数值计算,尤其是对多维数组的操作
import subprocess # 导入 subprocess 模块,用于执行外部命令(例如运行 shell 命令或启动其他程序)
import multiprocessing as mp # 用于实现并行处理(多进程),适用于 CPU 密集型任务,可以绕过 GIL(全局解释器锁)的限制
import threading # 导入 threading 模块,用于实现多线程编程
from datalink_serial import datalink  # 导入自定义消息类 datalink
- 枚举状态
class ExecState:
    WAITING = 0
    TRACKING = 1
    LOST = 2

exec_state = ExecState.WAITING
定义了一个枚举类ExecState,表示系统的三种执行状态:WAITING(等待)、TRACKING(跟踪)和LOST(丢
- 全局变量
is_detected = False # 跟踪检测状态
num_count_vision_lost = 0 # 计数丢失的次数
num_count_vision_regain = 0 # 重新获取目标的次数
VISION_THRES = 5  # 设置一个阈值用于检测稳定性
g_kp_detect = [0.5, 0.8, 0.8]  # 跟踪控制参数
Detection_distance = 0.8  # 跟踪间距
iou_threshold = 0.5  # IoU 阈值,用于判断是否跟踪同一个目标
- 程序入口
if __name__ == '__main__':
    W_img = 640
    H_img = 480
    shared_array = mp.Array('B', W_img * H_img * 3)  # 共享内存,大小为图片像素总数
    lock = mp.Lock()  # 互斥锁,保证对共享内存的访问是线程安全的

    ffmpeg_command = [
        'ffmpeg',
        '-i', 'tcp://192.168.0.201:2024',
        '-f', 'image2pipe',
        '-pix_fmt', 'bgr24',
        '-vcodec', 'rawvideo',
        '-'
    ]

    p1 = mp.Process(target=video_display, args=(ffmpeg_command, shared_array, lock))
    p2 = mp.Process(target=qr_code_detection, args=(shared_array, lock))

    p1.start() # 开始线程
    p2.start() # 开始线程

    p1.join()
    p2.join()
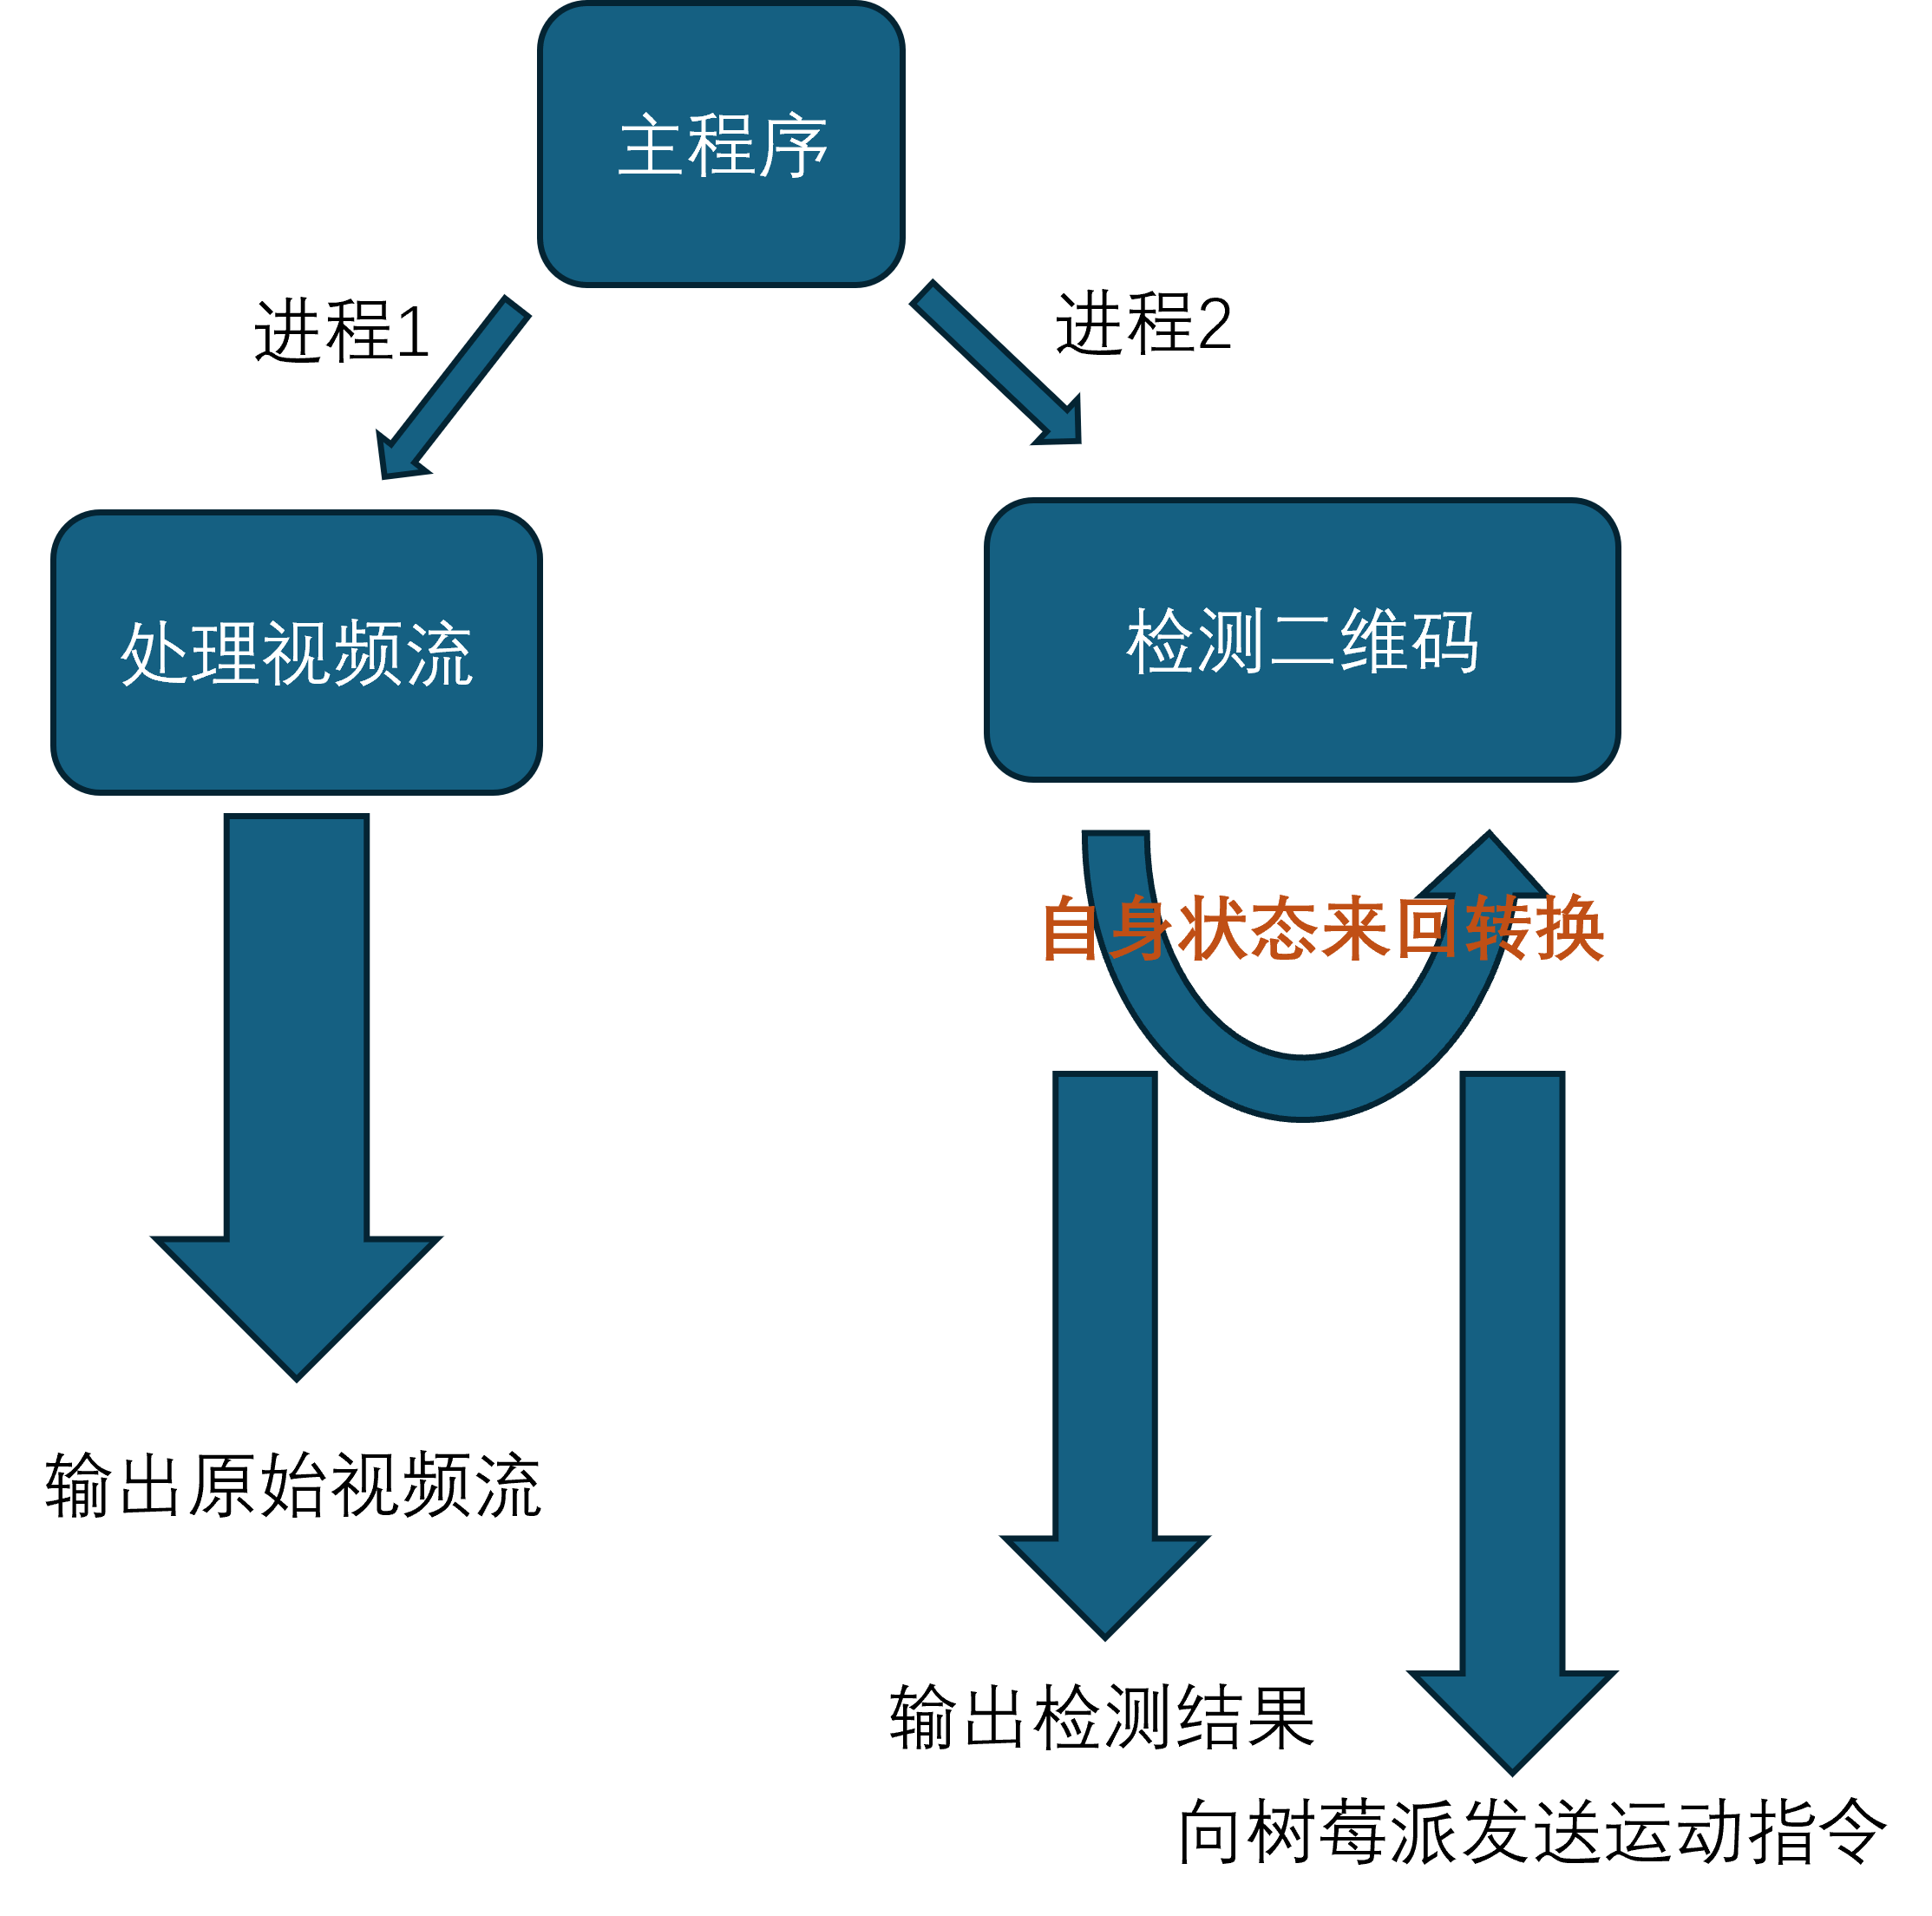
主程序通过多进程并发执行视频显示(video_display)和二维码检测(qr_code_detection)。共享内存用于在进程之间传递视频帧,互斥锁保证内存访问的线程安全。
- 视频流处理函数
入口参数:ffmpeg_command: ffmpeg命令处理视频流数据
         shared_array: 多进程共享内存对象,用于在多个进程间共享图像数据。
         lock: 用于保护共享内存访问的线程/进程锁(防止读写冲突)。
def video_display(ffmpeg_command, shared_array, lock):
    process = subprocess.Popen(ffmpeg_command, stdout=subprocess.PIPE)
    W_img = 640
    H_img = 480

    while True:
        raw_frame = process.stdout.read(W_img * H_img * 3) # 从 FFmpeg 的 stdout 中读取原始图像帧
        if len(raw_frame) != W_img * H_img * 3: # 判断是否读取到完整帧
            break

        frame = np.frombuffer(raw_frame, np.uint8).reshape((H_img, W_img, 3)) # 将原始字节数据转换为 NumPy 数组

        with lock:  # 确保写入共享内存时不会被检测进程读取打断
            np.copyto(np.frombuffer(shared_array.get_obj(), dtype=np.uint8).reshape(H_img, W_img, 3), frame)

        cv2.imshow('Real-Time Video', frame)

        if cv2.waitKey(1) & 0xFF == ord('q'):
            break

    # 关闭所有 OpenCV 窗口。
    # 终止 FFmpeg 子进程,释放资源。
    cv2.destroyAllWindows()
    process.terminate()
video_display函数负责处理视频流,使用FFmpeg命令获取视频帧,并将其存储在共享内存中,以供检测进程使用。同时,它还在窗口中实时显示视频流。
- 二维码检测与跟踪
功能:用于检测并跟踪共享内存中图像中的二维码,并根据检测结果进行姿态估计与控制指令发送。
参数说明:
shared_array: 多进程共享内存对象,用于从其他进程(如视频显示)获取图像帧。
lock: 互斥锁,用于保护共享内存的读写安全。
def qr_code_detection(shared_array, lock):
    global exec_state  # 声明 exec_state 为全局变量
    global is_detected, num_count_vision_lost, num_count_vision_regain  # 其他全局变量也需要声明

    W_img = 640
    H_img = 480

    FOV_x = 53.5  # 水平视场角,度
    FOV_y = 41.4  # 垂直视场角,度
    W_real = 0.155  # 二维码实际宽度,米
    H_real = 0.155  # 二维码实际高度,米

    k = 1.11  # 测量系数

    Kp_dx = 0.5 #控制姿态的P环参数
    Kp_dy = 0.5
    Kp_dalt = 0.5
    Kp_dyaw = 0.5

    # 计算相机的焦距 f,单位为像素
    f_x = (W_img / 2) / np.tan(np.radians(FOV_x / 2))
    f_y = (H_img / 2) / np.tan(np.radians(FOV_y / 2))
    print(f"f_x: {f_x:.4f}, f_y: {f_y:.4f} m")

    model = torch.hub.load('/home/wsg/桌面/yolov5', 'custom', path='/home/wsg/桌面/best.pt', source='local') #根据实际模型路径修改

    dl = datalink()  # 实例化 datalink
    data_thread = threading.Thread(target=dl.main)
    data_thread.start()

    target_locked = False  # 锁定标志
    target_box = None  # 记录锁定二维码的边界框

    while True:
        with lock:  # 确保读取共享内存时不会被显示进程写入打断
            frame = np.frombuffer(shared_array.get_obj(), dtype=np.uint8).reshape(H_img, W_img, 3).copy()

        results = model(frame)
        detections = results.pred[0]  # 获取预测结果,形状为 [n, 6] (x1, y1, x2, y2, conf, class)

        # 设置置信度阈值,过滤掉置信度低于0.6的检测结果
        conf_threshold = 0.6
        detections = detections[detections[:, 4] >= conf_threshold]

        if exec_state == ExecState.WAITING:
            if len(detections) > 0:
                target_box = detections[0][:4].tolist()
                target_locked = True
                is_detected = True
                exec_state = ExecState.TRACKING
                print("Target locked and tracking started.")
            else:
                print("Waiting for target to be detected.")

        elif exec_state == ExecState.TRACKING:
            if len(detections) > 0:
                found = False
                for *xyxy, conf, cls in detections:
                    iou = calculate_iou(target_box, xyxy)
                    if iou >= iou_threshold:
                        target_box = xyxy  # 更新锁定目标的位置
                        found = True
                        num_count_vision_regain += 1
                        num_count_vision_lost = 0
                        break

                if not found:
                    num_count_vision_lost += 1
                    if num_count_vision_lost > VISION_THRES:
                        exec_state = ExecState.LOST
                        print("Target lost.")
                else:
                    num_count_vision_lost = 0

                    x1, y1, x2, y2 = map(int, target_box)
                    W_qr = x2 - x1
                    H_qr = y2 - y1

                    cx_qr = (x1 + x2) / 2
                    cy_qr = (y1 + y2) / 2

                    cx_img = W_img / 2
                    cy_img = H_img / 2

                    dx = cx_qr - cx_img
                    dy = cy_qr - cy_img

                    angle_x_rad = k * np.arctan(dx / f_x)
                    dz_m = k * (W_real * f_x) / W_qr
                    dy_m = k * (dy / f_y) * dz_m
                    dx_m = k * (dx / f_x) * dz_m

                    dx_1 = dz_m - Detection_distance
                    dy_1 = dx_m
                    d_alt_1 = -dy_m
                    d_yaw = angle_x_rad

                    dl.set_pose(Kp_dx * dx_1, Kp_dy * dy_1, Kp_dalt * d_alt_1, Kp_dyaw * d_yaw)

                    label = f'dy: {dy_m:.2f} m, dz: {dz_m:.2f} m, angle_x: {angle_x_rad:.2f} rad'
                    cv2.rectangle(frame, (x1, y1), (x2, y2), (0, 255, 0), 2)
                    cv2.putText(frame, label, (x1, y1 - 10), cv2.FONT_HERSHEY_SIMPLEX, 0.5, (0, 255, 0), 2)

            else:
                num_count_vision_lost += 1
                if num_count_vision_lost > VISION_THRES:
                    exec_state = ExecState.LOST
                    print("Target lost.")

        elif exec_state == ExecState.LOST:
            print("Lost target, trying to regain...")
            if len(detections) > 0:
                target_box = detections[0][:4].tolist()
                exec_state = ExecState.TRACKING
                print("Target regained.")

        cv2.imshow('QR Code Detection', frame)
        if cv2.waitKey(1) & 0xFF == ord('q'):
            break

    cv2.destroyAllWindows()
    dl.socket_tcp.close()
    data_thread.join()
qr_code_detection函数负责二维码检测与跟踪。它加载YOLOv5模型,从共享内存中读取视频帧,并进行二维码检测。根据系统状态(WAITING、TRACKING、LOST),执行不同的逻辑来跟踪或重新获取二维码。检测到的二维码通过反馈控制来调整设备的位置。
摄像头坐标系与无人机坐标系转换
- 如果状态是跟踪态(TRACKING)
- *xyxy是识别的左上角坐标和右下角坐标,我们首先根据这两个坐标点计算出二维码高和宽(H_qr,W_qr),以及计算二维码的中心点
注意:这里是相机坐标系是以左上角为零点,xy平面平行于相机2D平面,z轴垂直于相机2D平面。
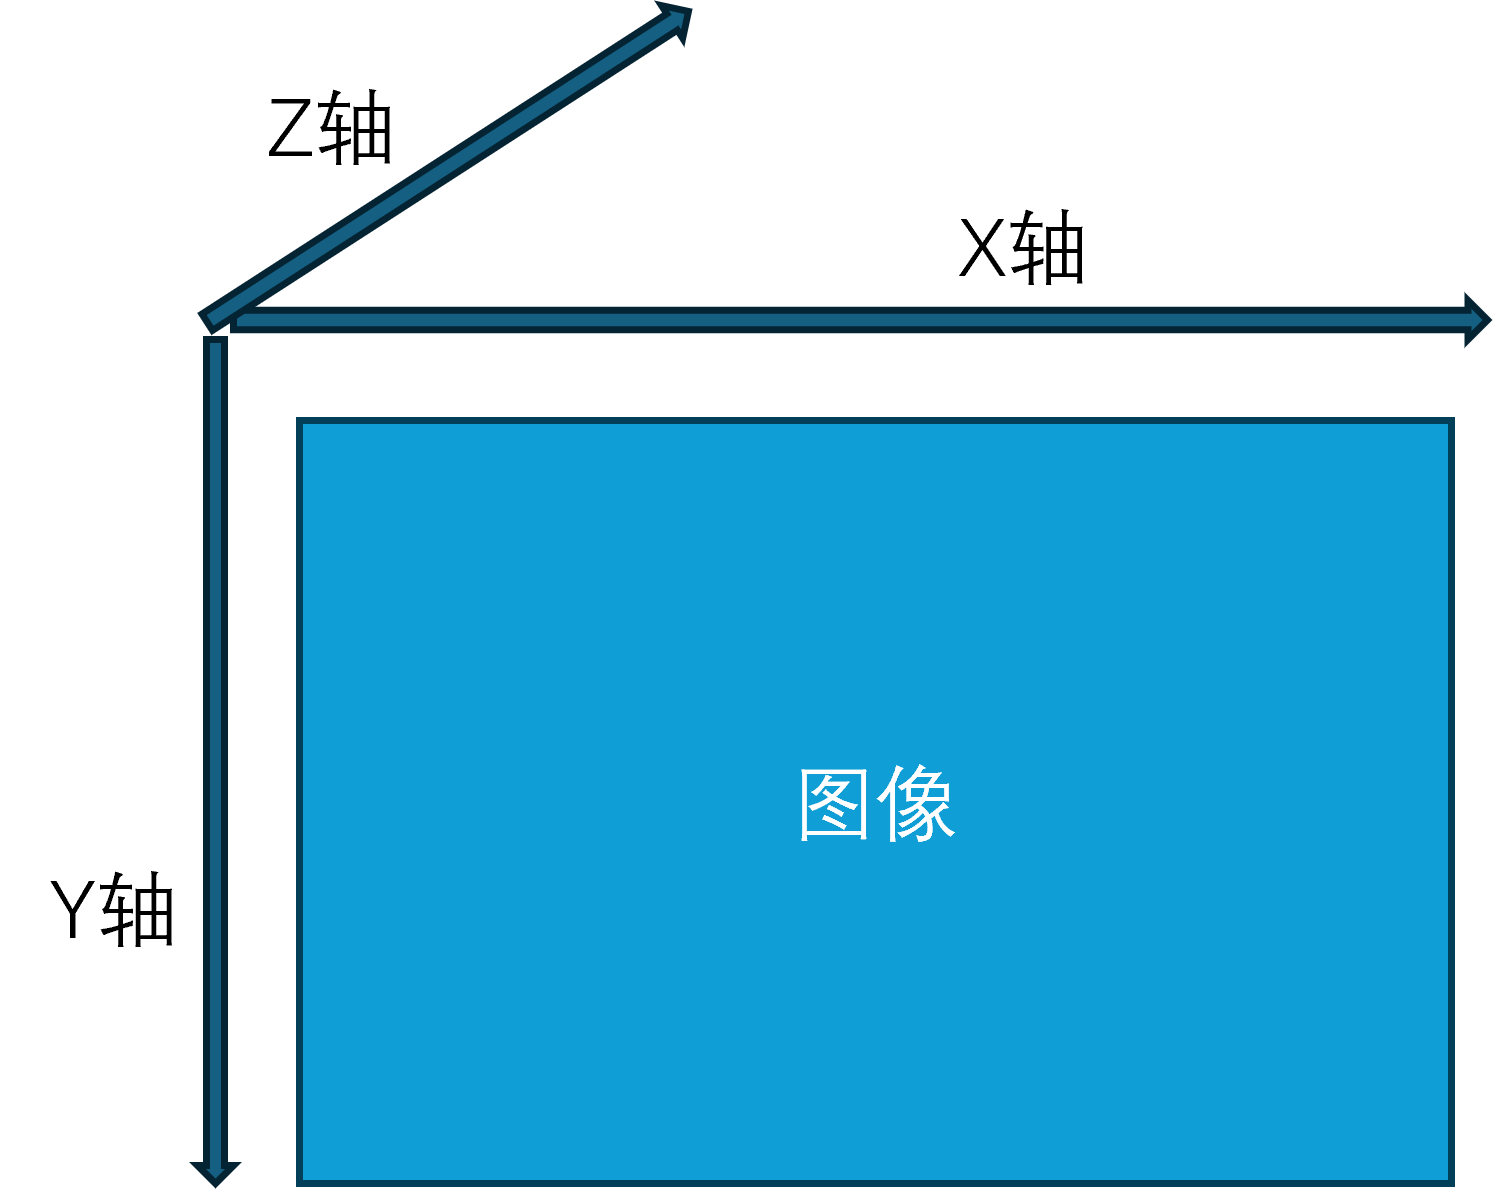
- *xyxy是识别的左上角坐标和右下角坐标,我们首先根据这两个坐标点计算出二维码高和宽(H_qr,W_qr),以及计算二维码的中心点
    elif exec_state == ExecState.TRACKING:
                if len(detections) > 0:
                    found = False
                    for *xyxy, conf, cls in detections:
                        iou = calculate_iou(target_box, xyxy)
                        if iou >= iou_threshold:
                            target_box = xyxy  # 更新锁定目标的位置
                            found = True
                            num_count_vision_regain += 1
                            num_count_vision_lost = 0
                            break

                    if not found:
                        num_count_vision_lost += 1
                        if num_count_vision_lost > VISION_THRES:
                            exec_state = ExecState.LOST
                            print("Target lost.")
                    else:
                        num_count_vision_lost = 0

                        x1, y1, x2, y2 = map(int, target_box)
                        W_qr = x2 - x1
                        H_qr = y2 - y1

                        cx_qr = (x1 + x2) / 2
                        cy_qr = (y1 + y2) / 2

                        cx_img = W_img / 2
                        cy_img = H_img / 2

                        dx = cx_qr - cx_img
                        dy = cy_qr - cy_img
- 相机坐标系转化为控制指令,我们的控制是基于无人机坐标系的,所以还需要进行相机坐标系向无人机坐标系的转换。
- 这里的dz_m是根据单目测距计算得出
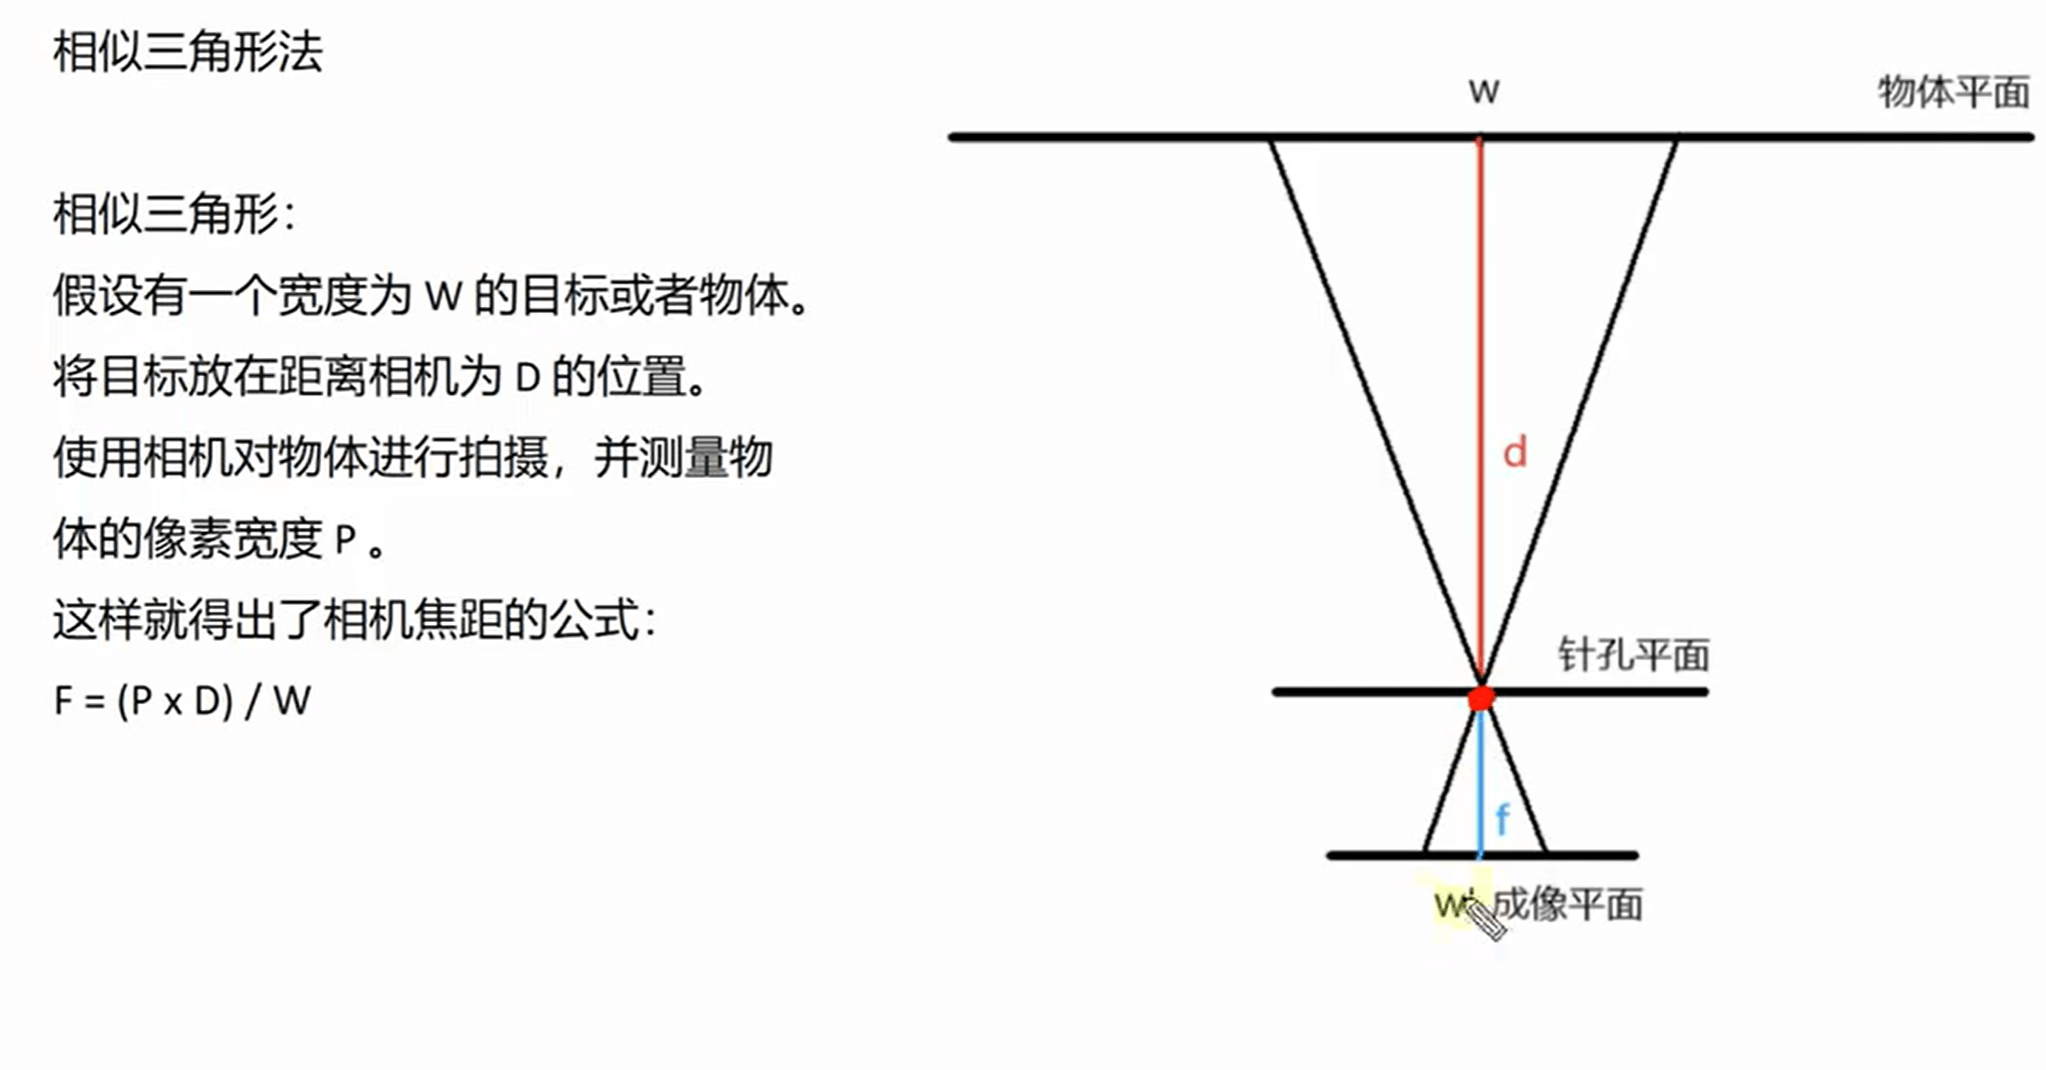
    angle_x_rad = k * np.arctan(dx / f_x)
    dz_m = k * (W_real * f_x) / W_qr
    dy_m = k * (dy / f_y) * dz_m
    dx_m = k * (dx / f_x) * dz_m

    dx_1 = dz_m - Detection_distance
    dy_1 = dx_m
    d_alt_1 = -dy_m
    d_yaw = angle_x_rad
- 控制无人机位姿函数,我们的x,y,z坐标,yaw轴姿态都是根据自身世界坐标系叠加偏移距离(角度)计算得出。
    # 设置位姿函数
    dl.set_pose(kp_x * dx_1, kp_y * dy_1, kp_alt * d_alt_1, kp_yaw * d_yaw)

    # dx:m  dy:m  d_alt:m  d_yaw:rad
    def set_pose(self, dx, dy, d_alt, d_yaw):
        if (self.pos_x != 0) and (self.pos_y != 0) and (self.att_yaw != 0):
            global_dx = dx * math.cos(self.att_yaw) - dy * math.sin(self.att_yaw)
            global_dy = dx * math.sin(self.att_yaw) + dy * math.cos(self.att_yaw)
            self.x = self.pos_x + global_dx
            self.y = self.pos_y + global_dy
            self.z = self.relative_alt + d_alt
            self.yaw = self.att_yaw + d_yaw
            self.mav_drone.set_position_target_local_ned_send(0, 0, 0, 0, 0, self.x, self.y, self.z, 0, 0, 0, 0, 0, 0, self.yaw, 0)
键盘控制代码说明。
- 如果想要加入键盘控制功能,请根据如下操作:
- 在datalink_serial.py文件的导入库文件部分
pynput 是一个用于监控和控制鼠标、键盘输入的 Python 库。# !/usr/bin/env python # coding=utf-8 import time import sys, os import threading import math import struct, array, time, json from mavlink import * from socket import * from pynput import keyboard # 导入键盘监听库文件
2. 在datalink类中加入函数on_press:
定义了一个按键事件处理函数,用于监听键盘输入,根据不同的按键执行对应的操作,如解锁、锁定、起飞、降落及前后左右移动。def on_press(self,key): try: # 获取按下的按键 print('You pressed {0}'.format(key.char)) if key.char=='a' : self.set_arm() print('解锁') if key.char=='d' : self.set_disarm() print('锁定') if key.char=='t' : self.set_takeoff() self.set_xy_pose(0, 0, 0) print('起飞') if key.char=='l' : self.set_land() print('降落') except AttributeError: print('You pressed {0}'.format(key)) if format(key) == 'Key.up': self.set_xy_pose(0.2, 0, 0) print('前进') if format(key) == 'Key.down': self.set_xy_pose(-0.2, 0, 0) print('后退') if format(key) == 'Key.right': self.set_xy_pose(0, 0.2, 0) print('右移') if format(key) == 'Key.left': self.set_xy_pose(0, -0.2, 0) print('左移')
3. main()函数如下所示
首先我们创建了一个键盘监听对象,并开始进行键盘按键的监听,最后我们需要监听程序不断运行。def main(self): print('data link is starting...\n') self.socket_tcp.connect(self.host_addr) drone_thread = threading.Thread(target=self.drone) try: drone_thread.start() listener = keyboard.Listener(on_press=self.on_press) # 创建键盘监听对象 -------- listener.start() # 开始监听 -------- while True: self.mav_drone.heartbeat_send(MAV_TYPE_GCS, MAV_AUTOPILOT_INVALID, MAV_MODE_FLAG_MANUAL_INPUT_ENABLED, 0, MAV_STATE_STANDBY, 1) time.sleep(1) except Exception as e: print("Error sending message:", e) finally: drone_thread.join() self.socket_tcp.close() listener.join() # 等待监听线程 --------